We are committed to partnering with you to provide comprehensive and effective graphic solutions for your event. The graphics print and production industry continuously evolves, and we want your graphics and images to look their absolute best. To ensure the highest quality output from your digital files, and to make file transfers as seamless as possible, please review and follow these guidelines when submitting artwork to GES. We also offer layout and design services for a fee. Please contact GES for details.
Save Money
- Save money by providing your artwork/graphic files in the recommended formats.
- Send your graphics early with client name, show name and booth number to avoid costly delays.
- Do not copy graphics from web pages as they will be low resolution and not suitable for your exhibit/sign.
Graphics
- Avoid setting type in Photoshop - instead use a vector-based program
(such as Adobe Illustrator or InDesign) for your type. If you do use vector smart
objects, save the file as an .eps or .psd to retain vector properties.
- If you plan to add effects to your type (such as drop shadows or glows),
follow these steps:
- Import the Illustrator type into Photoshop.
- Add effects to the type.
- Separate the effects onto a layer.
- Delete the type layer.
- Assemble the type and photo in a vector program.
- Always provide logos in a vector format.
- If you have critical PMS colors to match, provide a layered
Photoshop file to allow for color editing.
- Use gradients carefully and sparingly. Gradients often "band," and little
can be done to correct the problem. Look at your high res file at 100%: if
you can see the banding, it WILL appear in the print. Adding 1 pt. of
noise to the file may resolve the problem.
- Bleeds are not needed for large format printing.
Suitable Programs for images or logos
- Adobe Illustrator CC - .ai, .pdf, .eps, .svg
- Adobe InDesign CC - .indd, .pdf
- Adobe Photoshop CC - .pdf, .tif, .jpeg, .png
- Adobe Acrobat
Color
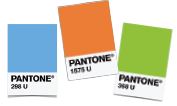
If your Vector artwork needs to be color specific, please set up your files
using the Pantone color pallet. Some Pantone colors are more likely to be
achieved than others. We will match all Pantone colors to the best
possible interpretation. We do our best to match any physical print sample,
however, the colors may deviate slightly due to the limitations within the
print process.
If providing colors as CMYK, please set colors as spot. Spot colors are
colors that have been specifically labeled within design software so that
RIP Stations can recognize them. Setting colors to "Spot" enables the
RIP Station to adjust the colors independently of the design software to
maximize work flow.

Text
Turn all fonts to outlines or convert to paths before sending files. If
you are using a program where this is not an option, YOU MUST
INCLUDE ALL FONTS with your files. OTF (open type fonts) are
preferred.
Editable Text
Outlined Text - preferred*

Artwork
Vector Artwork
For the best quality, create graphics in vector format (AI, EPS). Logos taken from
websites are generally GIF files, and those are not acceptable as they will not print
clearly. Artwork produced for contour cut decals, such as solid company logos or text,
must be supplied in a vector format (AI or vector EPS). Artwork created in a pixel format
(TIF, JPG) is not compatible with equipment.
preferred* AI/EPS (vector)
GIF, TIFF, JPEG (raster)

Bitmap/Raster Artwork
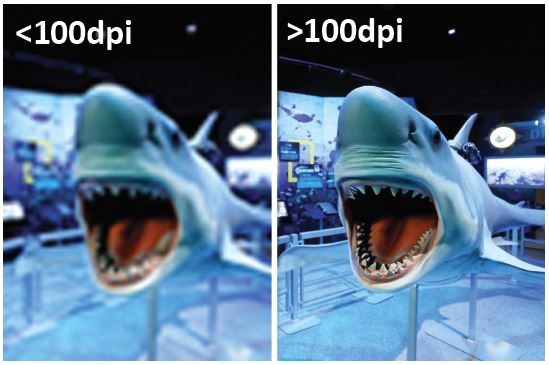
TIF, JPEG, PDF and PSD - These are the preferred file formats for raster images. Files should
be supplied at 100dpi at full production size, or they should scale to those dimensions. If the
resolution is lower than 100dpi at full production size, images can look blurry or pixelated
when printed. If there is a lot of small text in the raster image, the file can be provided at
higher resolutions to ensure print quality. Files obtained from the internet (JPG, GIF, PNG)
or artwork created in MS Office applications (Word, Excel, PowerPoint, etc.) are often not
suitable for high quality output for large/grand sized graphics or signage.
Final Print package should contain:
- Consistent color pallets in all files (if providing colors as CMYK,
please set colors as spot).
- All fonts converted to outlines and/or the fonts used.
- Embedded images and/or linked images.
- Final art at 100ppi at 100% scale. Files should not exceed 500MG.
- Mandatory ZIP compression
Standard Signage Information
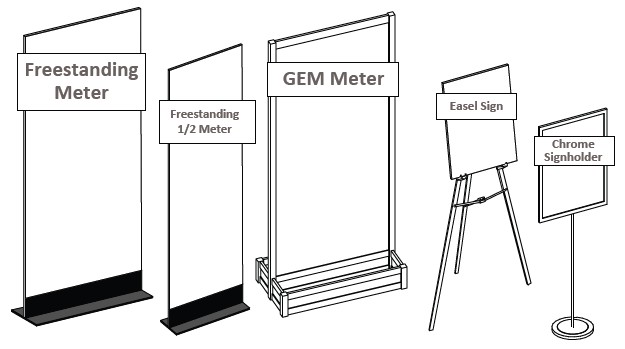
Sizes
- Freestanding Meter:
Overall Size 38.125" x 84"
Visual Area 38.125" x 78" (Bottom 6" of sign not visible because of base)
- Freestanding 1/2 Meter:
Overall Size 24" x 84"
Visual Area 24" x 78" (Bottom 6" of sign not visible because of base)
- GEM Meter:
Overall Size 38.125" x 86.25"
Visual Area 37" x 85" (Metal covers all edges of the sign)
- Easel Sign:
Overall Size 22" x 27.5"
Visual Area 22" x 27.5" (Single sided only)
- Chrome Signholder Sign:
Overall Size 22" x 27.5"
Visual Area 20" x 26" (Metal covers all edges of the sign)
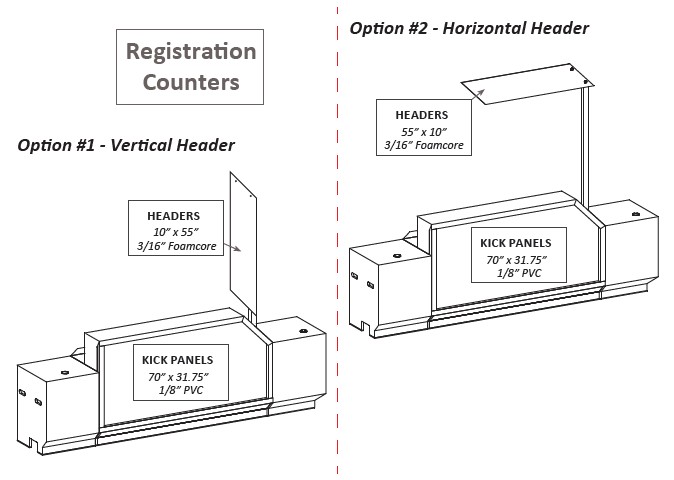
Registration Counter Information
Vinyl Banner Information
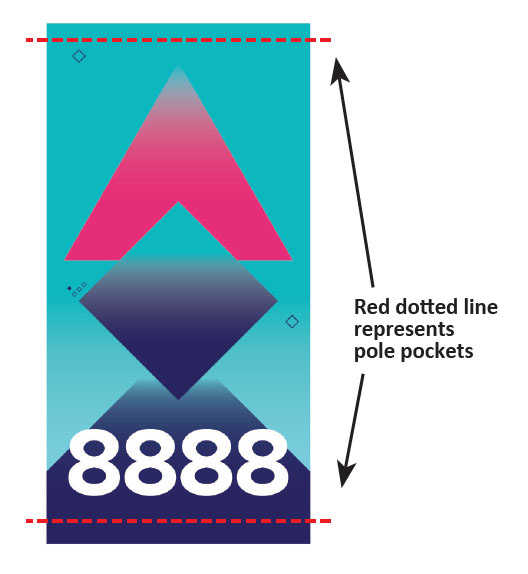
Banner Specifications and Guidelines
- 4" pole pockets are most commonly used
- Please avoid logos and text in pole pockets
- Other finishing: Velcro, Grommets and re-enforced stitching
Final Print package should contain:
- Consistent color pallets in all files
(if providing colors as CMYK, please set colors as spot).
- All fonts converted to outlines and/or the fonts used.
- Embedded images and/or linked images.
- Final art at 100ppi at 100% scale. Files should not exceed 500MG.
- Mandatory ZIP compression.
Layout Notes
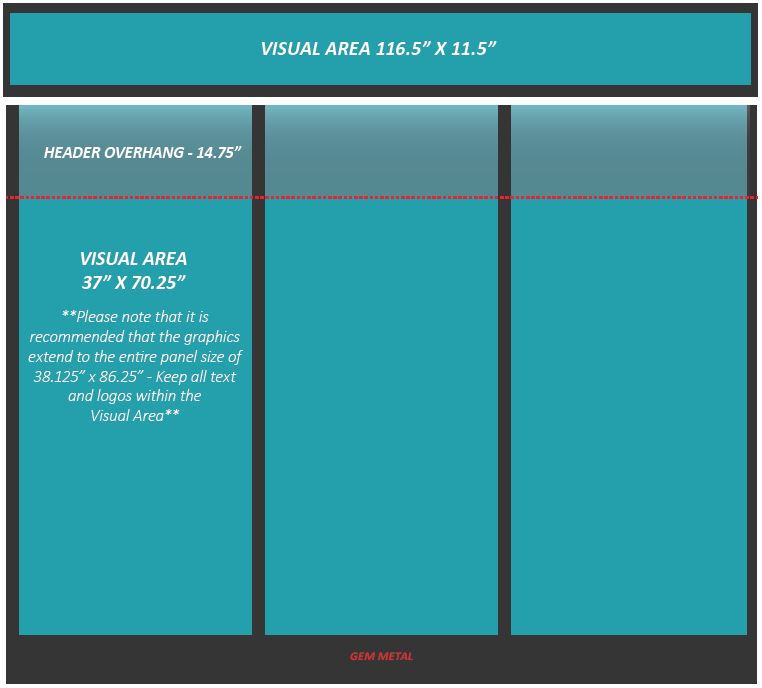
Trim Sizes
- Header - 117" X 12"
- Backwall Panels - 38.125" X 86.25"
Visual Areas
- Header - 116.5" X 11.5"
- Backwall Panels - 37" X 70.25"
Layout Tips
- Header - It is important that your logo or company name is prominent in the visual area to maximize the effectiveness of the graphic. Remember to keep all important assets within the visual area and to extend any graphic background or color to the entire trim size.
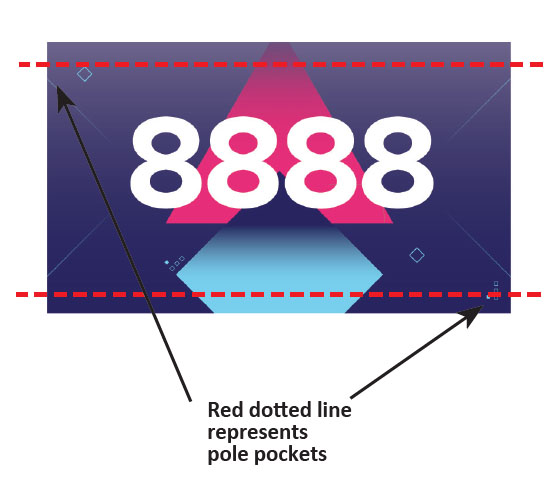
- Backwall Panels - It is important that your copy, photos, logos, etc. are prominent in the visual areas to maximize the effectiveness of the graphic. Remember to keep all important assets within the visual areas and to extend any graphic background or color to the entire trim size. The backwall panels are intended to be inserted into the structure which will result in approximately 2" of metal in between each panel. Therefore, mural style graphics are not recommended with this structure. See examples below.
This example is called "mural style." The placement of the metal makes the wording very difficult to read.
This second example is the recommended format for backwall graphics, which takes into account the placement of the metal to maximize the visual space.